Lenovo is in the middle of a storm right now surrounding its inclusion of the Superfish software in all of its consumer oriented computers. The software injects ads into things like search results, but in doing this it effectively breaks all secure connections over the Internet by installing its own certificates. The ins and outs of why that is very bad indeed have been covered to death both here and by security researchers across the Internet. What’s important now is how to get rid of Superfish for once and for all.
The steps for removing Superfish from your Lenovo computer are rather easy, actually. It’s a simple case of uninstalling a piece of software and removing a certificate, but for the sake of complete clarification, we’ve broken down the whole process into a step-by-step guide so you don’t get lost in the process.
All set for removing Superfish? Simply follow the steps we’ve outlined below.
Uninstall Superfish
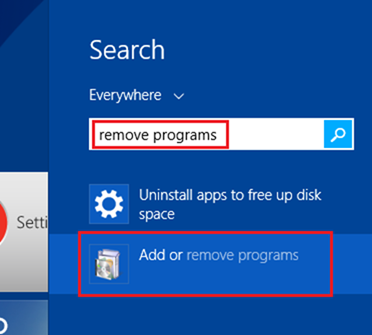
Step 1: Open the Windows Start Menu or Start Screen – depending on which version of the OS you are using – and search for ‘Remove Programs.’ Once the search is complete, open ‘Add or remove programs.’
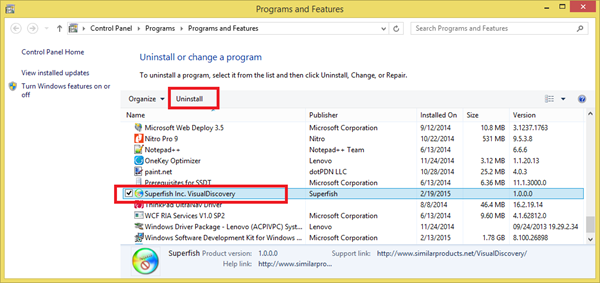
Step 2: Scan down the list of installed applications until you find ‘Superfish Inc. VisualDiscovery.’ Right-click it and uninstall it – or just click the ‘Uninstall’ button as shown in the screenshot below. If you’re prompted to enter an administrator password, do so.
Remove Superfish Certificate From Windows
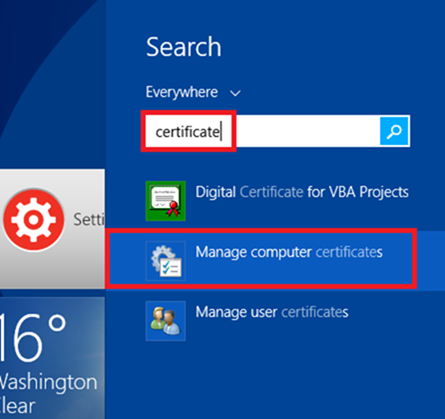
Step 1: Simply uninstalling the application is only part of the solution. Now you need to again open the Start Menu or Start Screen and this time search for ‘certificate.’ When presented with ‘Manage computer certificates,’ click to launch it. You might be prompted with a ‘Do you want to allow this program to make changes to this computer,’ simply select ‘Yes.’
Step 2: In the left hand-side panel, click on ‘Trusted Root Certification Authorities’ and then ‘Certificates.’
Step 3: Scroll down to the ‘Superfish, Inc.’ certificate and right-click it before clicking ‘Delete.’ Choose ‘Yes’ when prompted.

Remove Superfish Certificate From Firefox
If you’re also using Firefox then you need to remove the Superfish certificate from within the browser itself.
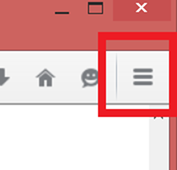
Step 1: Launch Firefox, go to ‘Options’ and then ‘Advanced’ followed by ‘Certificates.’

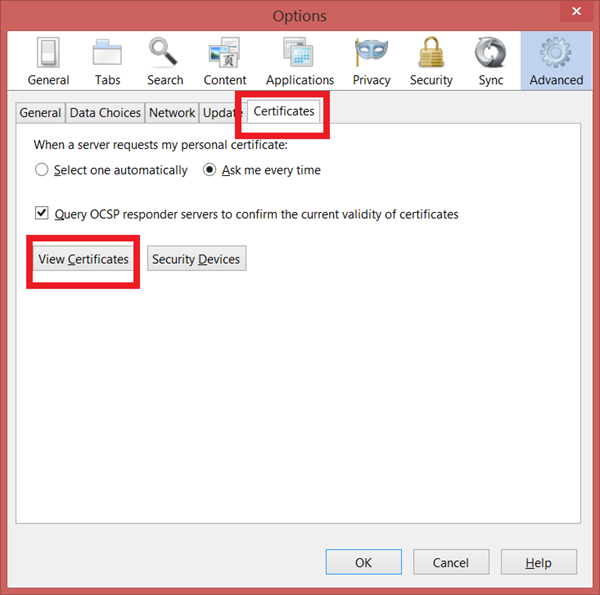
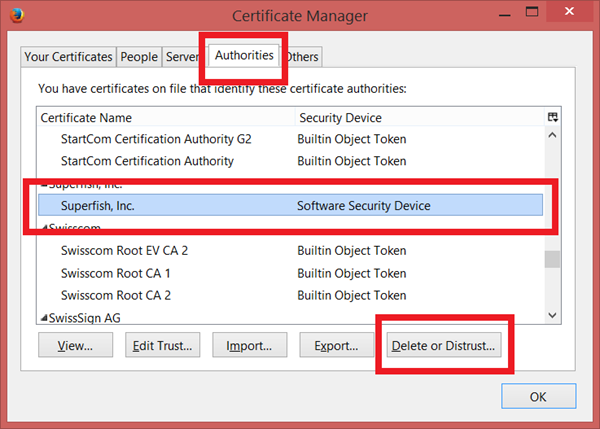
Step 2: Click ‘View Certificates’ and look for Superfish. If it’s there, select ‘Delete or Distrust.’
Update Windows Defender
Last but not the least, update Windows Defender to make sure it has the latest definitions. Microsoft has pushed out an update to Defender which also finds traces of Superfish and removes them for good.
And that’s it. You’re all done!
You can follow us on Twitter, add us to your circle on Google+ or like our Facebook page to keep yourself updated on all the latest from Microsoft, Google, Apple and the Web.

