Here’s how you can downgrade from iOS 12.1.3 to iOS 12.1.2 / 12.1.x on your iPhone, iPad, or iPod touch the right way. A relatively simple and easy-to-follow process which will leave you with a fresh installation of iOS 12.1.2 on your device.
With iOS 12.1.3 now out in an official capacity and being accessible by the public, and with iOS 12.1.2 still being signed by Apple, it’s possible to safely downgrade with a very small amount of effort and get back onto a version of Apple’s firmware prior to this latest release.

There shouldn’t be a huge amount of difference between the two firmware versions given that they are both relatively minor point releases but for those who want to downgrade for one reason or another, you’ll find the process below.
Before we head on with the process, here are a couple of requirement that need to met:
- Access to either a Mac or PC with the latest version of iTunes installed. This is important and you won’t be able to proceed without.
- Have possession of the correct iOS 12.1.2 IPSW file that has been created and released for your particular device. You can download it from here.
- An understanding and acceptance that you can only go as far back as iOS 12.1.2 as no additional versions of iOS are being signed by Apple.
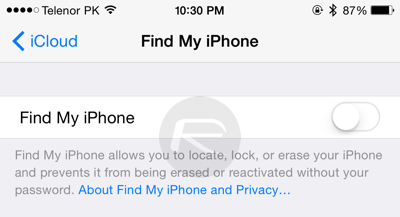
Step 1: Before you can jump in properly, you need to ensure that Find My iPhone is toggled OFF. On the device, launch the native Settings app and navigate to iCloud > Find My iPhone. Toggle the switch into the OFF position and enter the device’s passcode to confirm the change.

Step 2: Connect the iPhone, iPad, or iPod touch to the Mac or PC and make sure that iTunes is launched with the latest version of iTunes running. You now need to make sure that the device is put into DFU Mode using the guidelines below:
- iPhone 8 / 8 Plus, or iPhone X / XR / XS / XS Max owners: DFU Mode On iPhone X / 8: Here’s How To Enter It
- iPhone 7 or iPhone 7 Plus owners: Enter DFU Mode On iPhone 7 Or iPhone 7 Plus, Here’s How
- If you have an older device, then follow the instructions here.
With the device in DFU Mode and picked up by iTunes, you can continue with the downgrade via the process below.
Step 3: Make sure that the connected device is selected in iTunes. Hold down the Option (Mac) key or Shift (Windows) key and click on the Restore iPhone/iPad button. You will then be asked to select the firmware file (iOS 12.1.2 IPSW) of choice which you should already have on your machine. Within the popup window, point iTunes at that downloaded file.
Step 4: Once the IPSW file has been selected within iTunes it’s just a case of sitting and waiting for the software to go through its process. This may take an indeterminate amount of time so please be patient as iTunes goes about its business. After it has finished, you will be left with a device running iOS 12.1.2 as a fresh install on your device.
You may also like to check out:
- Download iOS 12.1.3 Final IPSW Links And OTA Update For iPhone And iPad
- iOS 12.1.3 Release Notes, Changelog And Other Changes You Need To Know About
You can follow us on Twitter, add us to your circle on Google+ or like our Facebook page to keep yourself updated on all the latest from Microsoft, Google, Apple, and the Web.

