Here’s how to easily disable or enable iSight Camera on Mac, particularly on MacBook, in macOS Sierra and protect your computer from prying eyes.
Have you ever sat blankly staring at your Mac’s embedded camera, either on an iMac or MacBook, and wondered if someone happens to be watching you in stealth even though the little green light isn’t active? Visit any organization which uses Macs for its computing needs, and you’ll see more than one MacBook on desks which has a piece of tape covering the iSight Camera. Some call it paranoia, others call it peace of mind. Whatever you want to call it, if you fear being watched without permission, you can actually disable access to the iSight Camera with a handy little third-party app called iSight Disabler. Here’s how to go about using it.


Step 1: Rather than mess around with a GitHub repository and trying to gain the technical knowledge on how to actually fiddle with code, you can just download the latest update in a zip format from Dropbox here. This will also give you macOS Sierra compatibility if you happen to be running Apple’s latest desktop OS.
Step 2: Once the zip file has been downloaded, do what you would normally do with a compressed file of this nature, and decompress it. That will give you access to all of the files inside, one of which, is a file called iSightConfigure.app.
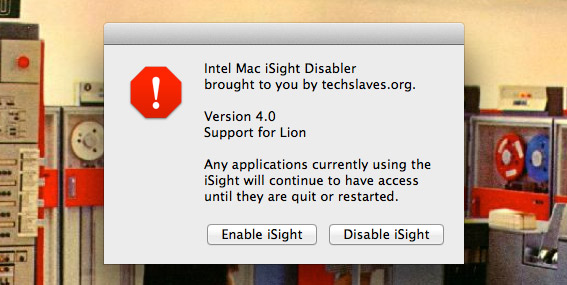
Step 3: This is the file that we want to concern ourselves with. It’s basically an Apple Script creation that is tasked with automating the process of enabling, or disabling the iSight Camera built into Apple’s Macs. Double click the file to launch the app.
Step 4: You’ll be presented with a familiar looking dialogue box with some information about the script, including an important knowledge bomb which states that all running applications that currently have access to the iSight Camera will continue to do so until they are restarted. Make sure you keep that in mind. Click on the Disable iSight button to prevent access to the camera.


Step 5: When prompted, enter the relevant password for the currently signed-in user or main administrator.
And there you have it. The iSight Camera will now be disabled until you go through the same process and select Enable iSight.
Of course, if you are of a technical persuasion, or just like to tinker and see the inner workings of things, then you can actually check out the iSight Disabler project directly on GitHub, which will let you see the commits, version history, and the source itself, if you’re into that sort of thing.
You may also like to check out:
- How To Check If Your PC Webcam Is Spying On You
- Apple Makes iOS 10.2.1 Beta 4 Available To Download
- Beware: MacBook Webcams Can Be Remotely Activated Without Showing Any Green Light Alert
- Cover Mac / MacBook Webcam And Mic By Getting Alerted About Unauthorized Access, Here’s How
You can follow us on Twitter, add us to your circle on Google+ or like our Facebook page to keep yourself updated on all the latest from Microsoft, Google, Apple and the Web.
