Here’s how to create and set any song file as custom iPhone ringtone using iTunes in a few simple steps. More details on how to do so can be found here.
Even though we live in a world where so many of us use our phones with the silent switch always flicked to the ‘ON’ position, there is still a time and a place for a nifty ringtone. Apple’s iPhone comes with some pretty cool ones already built in, but that means that all the good ones have already been used to death. What you need is a ringtone that’s a little bit unique.


Creating custom ringtones for your iPhone isn’t too difficult. All you need is a bit of audio snipping skills – or sourcing, depending on the situation – iTunes and a USB cable to get the ball rolling. Here’s how you can do just that.
Creating A Custom Ringtone
Step 1: Launch iTunes, open your music library, and select the song or audio bit which you want to use as a custom ringtone.
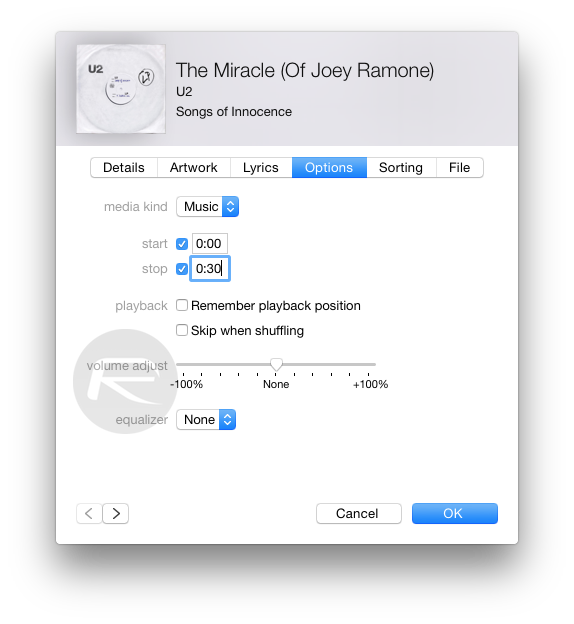
Step 2: Right-click on the song / audio bit, click on ‘Get Info,’ then click on the ‘Options’ tab, input the start and end time of the song which you would like to use as part of the ringtone. Click on ‘OK’ once you’re satisfied.


Note: The iPhone supports custom ringtones which can only be 30 seconds long. Therefore choose the bits wisely to create a perfect loop when the ringtone kicks in.
Step 3: Right-click on the song again and then click on ‘Create AAC Version’. Once you do this, iTunes will make a duplicate copy of the song in your library which has the duration that you defined in the previous step. Right-click on the newly created song and click on ‘Show in Finder.’
Step 4: Once in Finder, right-click on the newly created sound bit and then click on ‘Get Info’ and change the extension of the file to ‘m4r’ under the ‘Name and Extension’ drop-down.
Step 5: You can rename the ringtone to something else as well and place it on your desktop – or some place where you can access it easily. Just make sure the extension is ‘m4r’ not anything else.
Copying New Custom Ringtone Onto Your iPhone
Step 1: Launch iTunes.
Step 2: Connect your iPhone to your PC or Mac.
Step 3: Click on the three ‘dots’ button as shown in the screenshot below, then click on ‘Tones’ and drag your ringtone into the box in the resulting screen.
Step 4: Select your iPhone from the top bar in iTunes and then click on ‘Tones’ as shown in the screenshot below. Make sure you check the ‘Selected tones’ box to get a list of tones which you want to sync with your iPhone.
Step 5: Once you’re satisfied with your selection and everything looks to be in place, click on the ‘Apply’ button on the bottom right of iTunes to sync the ringtone with your iPhone.
Step 6: Pick up your iPhone, navigate to Settings > Sounds > Ringtones and you should see your brand new ringtone sitting on top.
And that’s it, you’re done.
You can follow us on Twitter, add us to your circle on Google+ or like our Facebook page to keep yourself updated on all the latest from Microsoft, Google, Apple and the web.
