Here’s how you can boot into Windows 10 Safe Mode on your PC. If you’re experiencing failures due to some incompatible installations, such as system drivers or apps, Safe Mode is your savior.
You may have come across plenty of discussions around the Internet regarding Windows 10, mostly on how Microsoft has revamped its latest OS, setting it apart from all the earlier offerings. With so many changes in Windows 10, Microsoft has also slightly changed the way we enter into Safe Mode as well.

Whether you have moved onto Windows 10 just now, or have done so when it was initially released last year, you may encounter issues that can only be fixed by putting your computer into Safe Mode.
This is where our following guide will come in handy. In a detailed step-by-step guide below complete with screenshot illustrations, we will show you how to reboot your computer running Windows 10 into Safe Mode in order to fix problems that are otherwise not possible to fix. We will be walking you through two different methods here, with first one using Advanced Startup options while the second one using System Configuration utility in Windows for booting into Safe Mode.
So without any further delay, here’s how to enter Safe Mode on your Windows 10 computer.
Advanced Startup Options
Step 1: To begin, right-click the Start button and move the mouse over Shut down or sign out, which will reveal a bunch of power options.
Step 2: Hold down the Shift key and click the Restart option. This should reboot your computer straight into the Advanced options screens.

There’s also an alternative way of accessing the Advanced options. Launch the Settings app (Windows key + I) and navigate to Update & security > Recovery. You should now see an Advanced startup banner followed by a Restart now button. Click it.

Step 3: Your Windows 10-powered machine will now boot into an option-laden screen as seen below. Here, select Troubleshoot to continue.

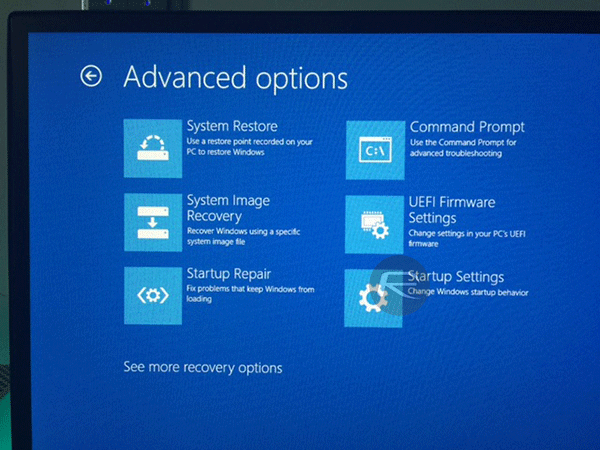
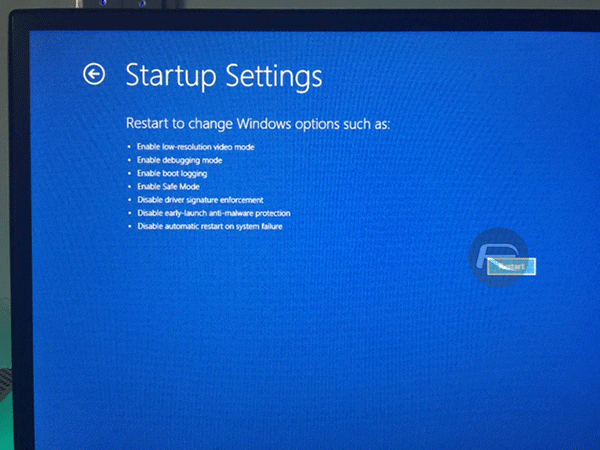
Step 4: Next, click Advanced options followed by Startup Settings and then click on Restart.


Step 5: Your PC will now automatically boot into another Startup Settings screen, with a bunch of startup options listed, each accompanied by a number. To reboot into Safe Mode simply hit the ‘4’ key or ‘F4’ key on your keyboard to initiate the restart. If you wish to boot into Safe Mode with Networking, press ‘5’ or ‘F5’.

System Configuration Utility
Step 1: Right-click the Start button and select Run.
Step 2: Type msconfig in the Run box and hit Enter.

Step 3: Once System Configuration is launched, navigate to the Boot tab and check the Safe boot option under Boot options. Make sure Minimal is also selected as the sub-option. Additionally, if you wish to maintain network connectivity in Safe Mode, check the Network option.

Step 4: Once the options are all set, hit the OK or Apply button, and restart your computer, which should now boot straight into Safe Mode.
It is important to note that once you’re in Safe Mode, you will have to instruct Windows to not boot into Safe Mode upon next reboot. To do this, simply launch System Configuration again and ‘uncheck’ the Safe boot option.
You may also like to check out:
- Download Windows 10 Pro ISO File Without Product Key From Microsoft
- Windows 10 Product Key And Activation: How To Find It And How It Works
- Fix No WiFi Available After Windows 10 Upgrade Issue, Here’s How
- How To Create Bootable Windows 10 USB Flash Drive [Guide]
You can follow us on Twitter, add us to your circle on Google+ or like our Facebook page to keep yourself updated on all the latest from Microsoft, Google, Apple and the web.

