MMS functionality for AT&T customers of iPhone 3G and iPhone 3GS running iPhone firmware 3.1 is set to launch officially on September 25th. Aaron Krill has posted a nice little trick to enable this functionality right now before the official launch on 25th.
The following step-by-step guide will help you enable MMS functionality on iPhone 3G and iPhone 3GS running firmware 3.1 on AT&T network:
Step 1: Download and install the latest version of iTunes if you haven’t already.
Step 2: Make sure iTunes is closed before following the steps below:
Windows 7 & Windows Vista:
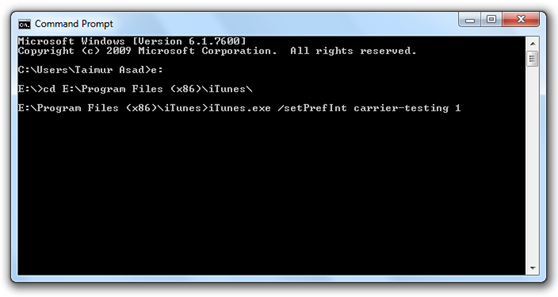
- Click on “Start” and type “Command Prompt” in search and then press enter.
- Goto \Program Files\iTunes\ directory by typing “cd C:\Program Files\iTunes\” in Command prompt and press enter. For those of you who are on x64 version of Windows should type this instead: "cd C:\Program Files (x86)\iTunes\”
- Now type “iTunes.exe /setPrefInt carrier-testing 1” in the Command Prompt and press enter.
Mac OS X:
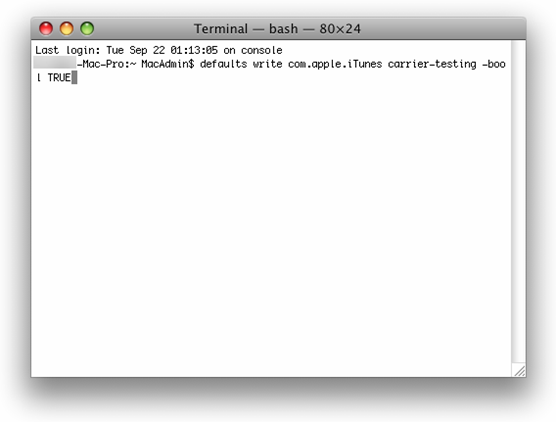
- Start the “Terminal” app by navigation to Applications –> Utilities. Or just type “Terminal” in spotlight search and hit enter.
- Now type this command and press enter: “defaults write com.apple.iTunes carrier-testing -bool TRUE”
Step 3: Download the modified .IPCC file (ATT_US.ipcc). Download link given below.
Step 4: Now connect your iPhone with your computer and start iTunes.
Step 5: Now press and hold left “alt” button (“Shift” button on Windows) on the keyboard and then click on “Check for Update” in iTunes and then release the “Shift” button.
Step 6: Select the .IPCC file which you downloaded in Step 3 and update your iPhone.
Step 7: Once the update is done, reboot your iPhone.
You should now have fully working MMS on your iPhone 3G and 3GS with visual voicemail.
UPDATE 1: AT&T has now officially launched MMS for iPhone 3G and iPhone 3GS users. Installation instructions can be found here.
Disclaimer: This guide is for testing & educational purposes only. I’m not responsible for any loss of important data or malfunctioning of your iPhone.


