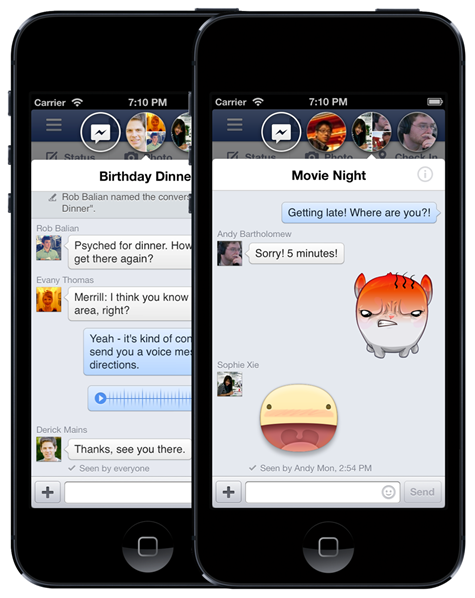
Here’s a complete step-by-step guide on how to enable Chat Heads and Stickers for your account on Facebook 6.0 app for iPhone, iPad and iPod touch. The new features aren’t rolled out for every account yet even if you have the latest 6.0 version of the app installed, the following guide will help you force-enable it on your device.
Activating Chat Heads is fairly straightforward, whereas enabling Stickers is a slight hassle, simply because the app talks to Facebook’s servers each time it becomes active and overrides any changes we make to the property list (or plist as it’s called in geek speak). It’s like they’ve actually put some thought and consideration into it. Nevertheless, where there’s a will, there is generally always a way to achieve the necessary output.

Follow the set of guides below to get up and running with Facebook Chat Heads and Stickers on your iOS device.
Enable Chat Heads in Facebook for iOS app
Step 1: The first step in the process is to download and install the iExplorer application for your PC or Mac, which you can grab from here. Tools such as iExplorer gives access to the iPhone or iPad file system without needing to jailbreak them. It is also possible to use alternatives or your already tried and tested desktop application if preferred.
Step 2: With iExplorer opened and the iOS device in question connected to the computer, navigate to Facebook/Library/Preferences.
Step 3: When in the above directory on the device, locate and extract the com.facebook.Facebook.plist property list. This particular file acts as a blueprint of sorts on how the app should actually behave.
Step 4: To enable the behavior that we actually want, we first of all need to make some changes to the acquired property list. If you have Xcode installed on the machine then open up the extracted plist in Xcode’s native editor. If not, then use your preferred plist editor to get access to the contents of the file.
Step 5: When the plist is open, we need to look for the messenger_chat_heads_ios key, which determines whether or not this feature is active. If that particular key does not yet exist in the file, then you will need to create a new row and add the key in verbatim. If it does exist, then change the corresponding value to either YES or TRUE. The representation of the BOOLEAN value will differ depending on what editor you are using.
Step 6: Save the modified plist in the editor. Copy and paste the file back to the original Facebook/Library/Preferences directory on the device making sure to replace the existing file if necessary.
Step 7: Kill the Facebook app on the device by removing it from the multitasking tray. Relaunch the app and you should notice that the heads of users will float around the screen when chat conversations are open. Annoying, but rather appealing at the same time.
Enable Stickers in Facebook for iOS app
Step 1: The first step is to find and download a software that can enable us to proxy and change data that is sent over the network. For the sake of this guide we are recommending Charles Proxy which you can grab from charlesproxy.com.
Step 2: Next, we need to proxy the traffic of the device through the new Charles installation. Launch the Facebook app and make sure to look for the Facebook API request that is made to their servers. It will take the form of http://api.facebook.com/method/……[long string of parameters in here]. The response data that comes back from Facebook’s servers is basically telling the app to not grant you access to Stickers (unless of course the powers that be at Facebook have given the green light). The response data should include project_name entry of messenger_sticker. If Stickers have not been enabled on the account then this will be set to FALSE.
Step 3: In the Charles app, select the Tools menu and click on the Rewrite option. Select the Add button in the bottom right hand corner in order to create a new rewrite rule for the traffic. Click the Add option that is located below the top pane and enter a Host value of https://api.facebook.com/method/fql.multiquery.
Step 4: Move onto the next field to allow Charles to format the inputted data into something it can use and then Click Ok. Click the Add button below the bottom pane in Charles to add the actual guts of the rules that we want it to obey. Set the Type to Body and make sure the Request box is unchecked but the Response box is checked.
Step 5: In the Match section of the interface, set the value to {“project_name”:”messenger_sticker”,”result”:false}. Underneath that, in the Response section, set the value to {“project_name”:”messenger_sticker”,”result”:true}. We are essentially forcing Charles to accept the returned data from the Facebook servers and replace the permissions to allow the app to do what we want.
Step 6: Select OK to add the rule and then hit OK again to exit out of the settings interface.
Step 7: Make sure the Facebook app is closed entirely before re-launching it. The API call should always be the same when the application launches as it attempts to communicate with Facebook and pull in the required data. However, if the Charles Proxy rule has worked then the returned data should be slightly amended and Facebook Stickers should be working. Victory.
(via: iMore)
You can follow us on Twitter, add us to your circle on Google+ or like our Facebook page to keep yourself updated on all the latest from Microsoft, Google, Apple and the web.
