Live Mesh is an amazing platform. There are so many things which you could do with it. Imagine a scenario where you are in your office in some remote  location. You make some updates to your calendar events or add some new appointments. You also make changes to your Emails, and add another contact name. Now you go back home and have all the changes which you made in your office reflected back to your home PC. Wouldn’t that be great?
Now lets see how are we going to achieve all this. The procedure below uses Microsoft Outlook in Windows Vista as the example device. If you are using Windows Live Mail, Windows Calendar and Windows Contacts for your emails, appointments and contacts, then check out the Note mentioned at the bottom of this article.
Microsoft Outlook stores all the users data(Emails, Calendar, Contacts & Tasks) in a outlook compatible .pst file. This .pst file is stored at C:\Users\[Username]\AppData\Local\Microsoft\Outlook\ location.
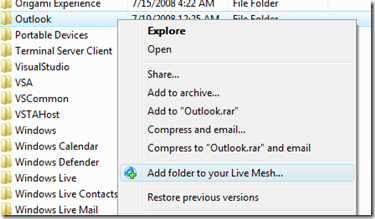
Step 1: On your deviceA, navigate to this location: C:\Users\[Username]\AppData\Local\Microsoft. Here right click on Outlook folder and click on “Add folder to your Live Mesh”.
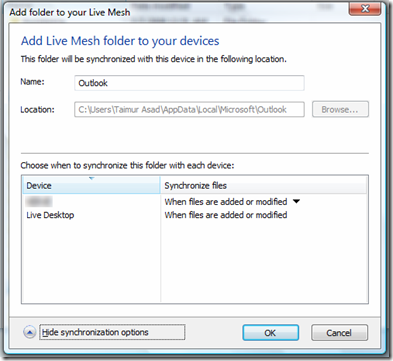
Step 2: In synchronization settings, select the devices to which you want your Outlook Calendar, Emails etc to synchronize with.
Your deviceA is now set up to sync all your Calendar appointments, contacts, email etc. It will take a while(depending on your Internet connection) for deviceA to upload all your data to Live Desktop.
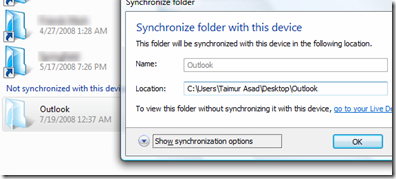
Step 3: Now on deviceB, go to C:\Users\[Username]\Live Mesh Folders\. Here you will see a blue colored(faded) shortcut for your Outlook folder. Double click on it and set this location C:\Users\[Username]\AppData\Local\Microsoft\Outlook\ of your Outlook folder on the deviceB to synchronize with all the Calendar events, contacts, emails and tasks of Outlook from your deviceA and Cloud(Live Desktop).
That’s it. You have successfully synchronized your calendar, emails, tasks and contacts of Outlook from deviceA to the Cloud(Live Desktop) to deviceB.
Step 4: Similarly, you can repeat step 3 to synchronize the same Calendar events, contacts, emails and tasks of Outlook with any other device.
NOTE: If you want to add contacts from Windows Contacts, calendar appointments from Windows Calendar and Emails from Windows Live Mail then just add the following folders to your Mesh and then simply follow Step 2 to Step 4 to synchronize these with all your other devices.
![]() Windows Contacts: C:\Users\[Username]\Contacts
Windows Contacts: C:\Users\[Username]\Contacts
![]() Windows Calendar: C:\Users\[Username]\AppData\Local\Microsoft\Windows Calendar\Calendars
Windows Calendar: C:\Users\[Username]\AppData\Local\Microsoft\Windows Calendar\Calendars
![]() Windows Live Mail: C:\Users\[Username]\AppData\Local\Microsoft\Windows Live Mail
Windows Live Mail: C:\Users\[Username]\AppData\Local\Microsoft\Windows Live Mail
Check out our Live Mesh Scenarios Directory for more tutorials.
UPDATE: As Aaron rightly pointed out. Unfortunately Live Mesh blocks .pst file from synching across multiple devices. There is a workaround for it but it isn’t all that perfect. You can trick Live Mesh to sync your Outlook data file by renaming the .pst to .pstx(or any other. You must backup your existing file before changing the extension) file. Live Mesh will upload the file to the cloud and then it syncs back .pstx file across all those devices which you have selected it to sync with. After the file has been uploaded, you will have to go to your Live Desktop and then rename .pstx file back to .pst. At this point you will notice that this change happens on all the devices and Outlook on all devices now reads all the data from the new .pst file. But since .pst file is not supported by Live Mesh, it will delete the .pst file from cloud only as soon as you change the extension to .pst from .pstx. So you will have to repeat this procedure every time you make a change to your Outlook’s data which probably isn’t all worth it. I don’t exactly get why .pst file is not supported. Hopefully the future versions of Live Mesh will support it. That said, the above tutorial has no such issues if you use Windows Contacts, Windows Live Mail and Windows Calendar for your contacts, emails and calendar appointments.

