As operating systems have evolved, their primary goal has always been to make computing easier for the end user, be it a tablet, a smartphone or a desktop computer. Thanks to hybrid operating systems like Windows 8, and the deep integration that Apple’s OS X and iOS enjoy, the difference between various hardware platforms is quickly diminishing, making room for a more streamlined, unified experience. However, good as the intention may be, in doing so, some of the convenience aspects beget a security risk, thereby exposing the system in question to security breaches and execution of undesired code. One such feature in Windows – the most widely used desktop operating system – is the AutoPlay (or AutoRun, as it was formerly known). In this article, we’ll tell you how to disable AutoPlay / AutoRun for good at a system-wide level.
Difference Between AutoPlay & AutoRun
Before we get to disabling the feature, let’s quickly take a glance at what these two terms mean, and whether there is any difference between the two or not. Essentially, AutoRun and AutoPlay are both the same, in that AutoPlay is the successor of AutoRun from older versions of Windows like XP, 2000 and earlier. When AutoRun was introduced, it basically allowed manufacturers of removable storage media (particularly CD/DVD ROMs) to incorporate an autorun.inf file within the device, which instructed the operating system which application (or executable) to call when you inserted the storage device. Windows Vista onwards, Microsoft made room for more choices with the introduction of AutoPlay, which basically allowed the user to choose what program the AutoRun feature should call once invoked. This also allowed leverage for USB-based storage media, extending the support beyond just optical disks. Hence, in essence, both are the same, with AutoPlay being the more advanced of the two.
To disable AutoPlay or AutoRun completely, you can either use the Local Group Policy Editor, if your version of Windows ships with that, or the Registry Editor. We’ll explain both step by step.
Disable AutoRun / AutoPlay Using Local Group Policy Editor
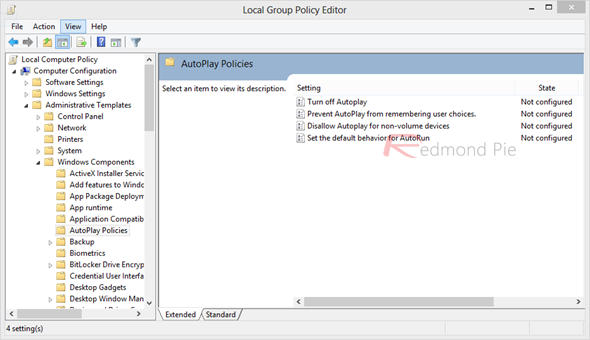
Step 1: Pull up the Run dialog box (Win + R) and type gpedit.msc. Hit Enter to launch the Local Group Policy Editor.
Step 2: Within Group Policy Editor, navigate to this location:
Computer Configuration > Administrative Templates > Windows Components > AutoPlay Policies

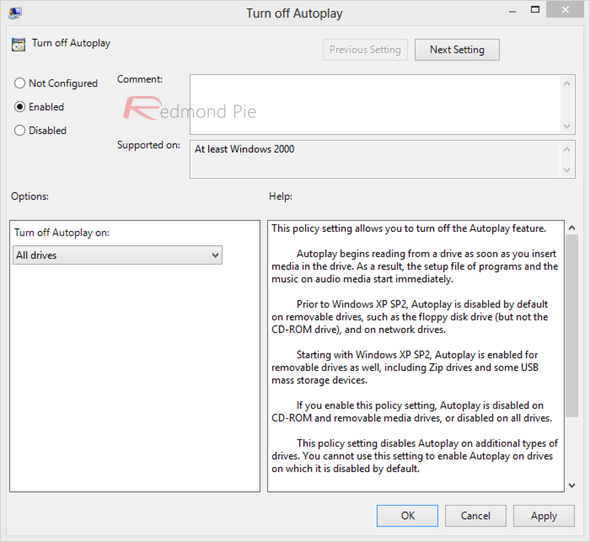
Step 3: Double-click the Turn off Autoplay option to edit its settings, select Enabled, and then select All drives in the options panel below. Hit Apply when done.

Step 4: Restart your computer.
That’s it; the AutoRun feature has been completely disabled for all users, and for all drives that connect to your machine.
Disable AutoRun / AutoPlay Using Registry Editor
Should you have a version of Windows that doesn’t ship with Local Group Policy Editor, follow these instructions.
Step 1: In the Run dialog, type regedit to launch the Registry Editor.
Step 2: Depending on whether you want to disable AutoRun for all users or just for the current one, navigate to either of these registry keys (the first one is for all users):
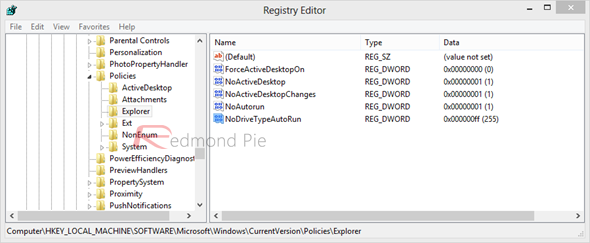
HKEY_LOCAL_MACHINE\Software\Microsoft\Windows\CurrentVersion\Policies\Explorer\
HKEY_CURRENT_USER\Software\Microsoft\Windows\CurrentVersion\policies\Explorer\
Step 3: Within this subkey, locate the setting labeled “NoDriveTypeAutoRun”. If it doesn’t exist, create a new 32-bit DWORD with this name and assign it the hexadecimal value 000000FF (Decimal 255).

Step 4: Restart the computer.
The DWORD defined above will disable AutoRun for all drives and devices, and will have the same effect that you would’ve gotten through Local Group Policy Editor.
Should you want to restore AutoPlay ever again, just reverse the changes that you made in these steps, and you should be good to go.
You can follow us on Twitter, add us to your circle on Google+ or like our Facebook page to keep yourself updated on all the latest from Microsoft, Google, Apple and the web.

